In the last couple of days, I've actually managed to stir myself into action and start a new project.
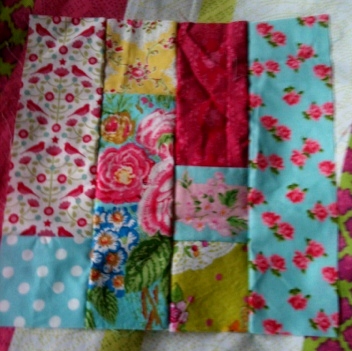
Introducing the bare bones of my "Pretty Random" quilt. How can it possibly be called anything else? For the fabrics are most certainly pretty, and as quilt designing goes - it doesn't get more random than this.....

Whilst clearing away a pile of fabric to get at my cutting table, I suddenly realised that all the brights went together rather well, albeit in an "in your face, grab the migraine tablets quick" sort of way.
I absolutely adore each and every one of the fabrics. I have no idea where all of them have come from. I know there's some SisBoom and some Tilda. The rest is anyone's guess? I received some of the brights as part of a secret santa swap, I know I bought the aqua polka dot for next to nothing locally, and there's a bit of a charity shop girl's dress thrown in as well.
Though all small pieces, there seemed to be quite a lot of them. My first thought was to make a bag, as I've had an idea brewing for a new design for a while. Picking up the first scrap - a gorgeous piece of Sis Boom Flower Power (sadly discontinued), it's panel design lent itself to a 3 inch square. I can happily fussy cut away at fabric forever, and so I began. With no clear plan in mind, I just used all the fabrics as a guide, my only aim being to create a pile of shapes that would fit together. So.... a growing pile of pieces began to form - 3.5 inch squares, 6.5 x 3.5, 9.5 x 3.5, 6.5 x 6.5, 12.5 x 3.5 and 12.5 x 6.5. I got a bit carried away, and by the time I'd exhausted my pile of scraps it was clear that I had far more than was necessary for a bag.
Hmm..... a quilt it is then. After flinging a few together, it seemed to me that a 12 inch square would work. Without any planning whatsoever, I set about chain-piecing, dragging each piece from the pile. As long as no matching fabrics connected together I thought it would work. My only target was that each square would be different.

By sheer luck, by the time I'd used up nearly all the scraps - I'd managed to complete 12 squares. All different - I think!

Therefore my finished quilt will be a single-bed size. 3 squares wide by 4 deep. After laying them out on a grey fleece blanket, I'm thinking that the sashing will be this shade, as it's already quite bright enough. With this in mind I dropped into the fabric shop on my way to work yesterday. As luck would have it (isn't it always the way?), they seemed to have every plain in stock but the one I wanted. Darn! My hopes of carrying on with it today are dashed. Me thinks I must look online..... surely it can't be that hard to find a charcoal grey plain?

I'm yet undecided what else to do with it. It could be a quick sew it up and fling it on the bed. Or - do I fussy cut some applique shapes out and add to the mix. Sorely tempted. Perhaps a few yo-yo's? All I know is that I hope I've got enough tiny scraps left to stitch together to make a snazzy binding.

To be continued........

eventually! :)

Introducing the bare bones of my "Pretty Random" quilt. How can it possibly be called anything else? For the fabrics are most certainly pretty, and as quilt designing goes - it doesn't get more random than this.....

Whilst clearing away a pile of fabric to get at my cutting table, I suddenly realised that all the brights went together rather well, albeit in an "in your face, grab the migraine tablets quick" sort of way.
I absolutely adore each and every one of the fabrics. I have no idea where all of them have come from. I know there's some SisBoom and some Tilda. The rest is anyone's guess? I received some of the brights as part of a secret santa swap, I know I bought the aqua polka dot for next to nothing locally, and there's a bit of a charity shop girl's dress thrown in as well.
Though all small pieces, there seemed to be quite a lot of them. My first thought was to make a bag, as I've had an idea brewing for a new design for a while. Picking up the first scrap - a gorgeous piece of Sis Boom Flower Power (sadly discontinued), it's panel design lent itself to a 3 inch square. I can happily fussy cut away at fabric forever, and so I began. With no clear plan in mind, I just used all the fabrics as a guide, my only aim being to create a pile of shapes that would fit together. So.... a growing pile of pieces began to form - 3.5 inch squares, 6.5 x 3.5, 9.5 x 3.5, 6.5 x 6.5, 12.5 x 3.5 and 12.5 x 6.5. I got a bit carried away, and by the time I'd exhausted my pile of scraps it was clear that I had far more than was necessary for a bag.
Hmm..... a quilt it is then. After flinging a few together, it seemed to me that a 12 inch square would work. Without any planning whatsoever, I set about chain-piecing, dragging each piece from the pile. As long as no matching fabrics connected together I thought it would work. My only target was that each square would be different.

By sheer luck, by the time I'd used up nearly all the scraps - I'd managed to complete 12 squares. All different - I think!

Therefore my finished quilt will be a single-bed size. 3 squares wide by 4 deep. After laying them out on a grey fleece blanket, I'm thinking that the sashing will be this shade, as it's already quite bright enough. With this in mind I dropped into the fabric shop on my way to work yesterday. As luck would have it (isn't it always the way?), they seemed to have every plain in stock but the one I wanted. Darn! My hopes of carrying on with it today are dashed. Me thinks I must look online..... surely it can't be that hard to find a charcoal grey plain?
I'm yet undecided what else to do with it. It could be a quick sew it up and fling it on the bed. Or - do I fussy cut some applique shapes out and add to the mix. Sorely tempted. Perhaps a few yo-yo's? All I know is that I hope I've got enough tiny scraps left to stitch together to make a snazzy binding.

To be continued........

eventually! :)
Gorgeous already! Lucky u w those 'scraps' :) I love the vibrant colors!
ReplyDeleteI love projects like that. It is so fun to just sit and see what comes out of your creative flurry.
ReplyDelete